If you need to identify Dataverse rows and you are working with tables containing lots of data, FetchXML is a way to get those rows without any delegation issues!

Recently I’ve been working on a Canvas Apps project that required Grandchildren rows to be displayed in a gallery.  The amount of data in the tables wasn’t large and through using a combination of the Filter function and collections I got it working just fine.  If you’d like to read about how I did that then check out my post here

However the solution wasn’t delegable and it got me thinking how would I access the same data on a much large data set.  The answer is to use FetchXML

FetchXML

FetchXML

FetchXML is the XML based query language of Dataverse.  FetchXML can’t be called directly within a Canvas App but it can be used in a Flow.  The relevant parameters can be passed dynamically from a Canvas App to Power Automate.  The query is executed in a Flow and the results returned to the Canvas App.  Importantly, because the query is executed in Flow there are no delegation issues to worry about!

Below are the steps to get up and running using FetchXML.  In my example I’m displaying all the rows in the County table for a particular Country

Dataverse Tables

Step 1 – Install the XRMToolBox

Open or install the XRMToolBox and once done open the FetchXML Builder tool.  If you are working with Dataverse and don’t yet have the XRMToolBox installed then give it a look, it contains some really useful tools.

Installing the XRMToolBox and connecting to your Dataverse tenant is beyond the scope of this article but it isn’t complex and a Google search will take you to blog posts and videos that will take you through it step by step

Step 2 – Use the FetchXML Builder Tool to create your FetchXML

Once you’ve got the XRMToolBox up and running and connected to Dataverse, open the FetchXML Builder tool.  Select ‘New Query’ from the ‘New’ menu and have a play around.  You’ll be surprised how easy it is to run queries and get the results displayed in the output window.  Start with a simple query and build from there.  Selecting ‘Execute’ displays the results

In the example below I’ve created a fairly simple query for my table structure that displays all the counties in England

Once you are happy that the query is correct, select ‘View’ and ‘FetchXML’ and you will see the actual FetchXML that is used to execute the query

This is the baseline FetchXML that will be used in Flow so copy it, we will be using it in Power Automate shortly

Step 3 – Create the Flow

Below is the Flow to process the query and pass the results back to Power Apps

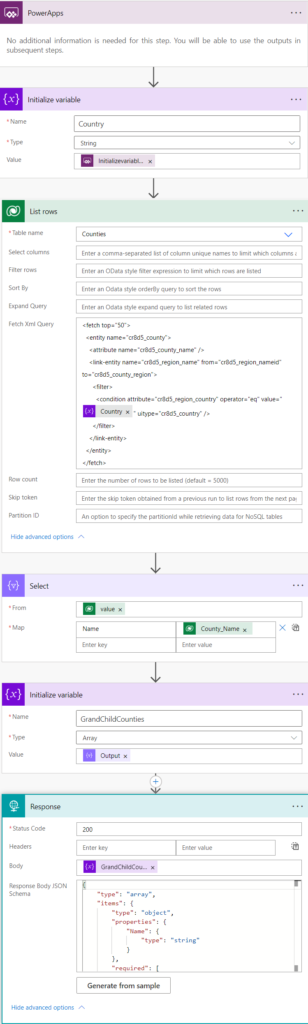
Create an Instant Cloud Flow that is triggered by Power Apps and create a step to initialise the variable passed from Power Apps

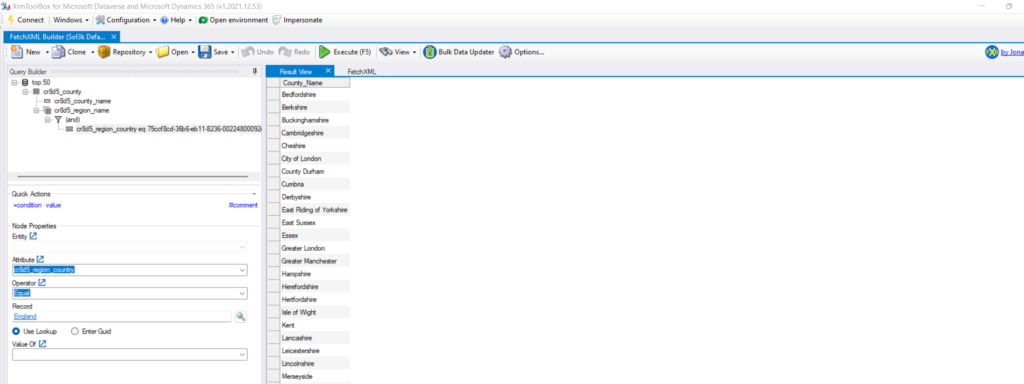
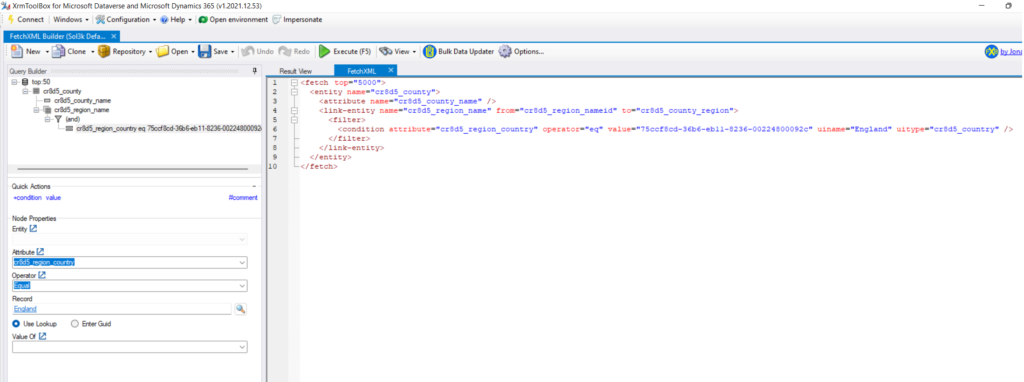
In the Dataverse Step, having selected the required table, navigate to the Fetch XML Query section and paste the FetchXML copied from FetchXML Builder earlier

Add a Select step.  Select is used to transform data but we will primarily use it to get the XML output from the previous step, as you’ll see.  Set the From field to ‘value’ which is the output from the previous step.  Map the Keys and Values as required

Add an Initialise Variable step.  This will create the array variable containing the output to pass back to Power Apps.  Give the variable an appropriate name and set the Type field to Array.  The Value is the Output from the previous step

Finally add a Response step.  Set the Body to the variable created from the previous step

Save the Flow.  Click on ‘Test’, ‘Manually’ and then ‘Run Flow’

Within the test results, open the Select step and copy the body contents, which is in XML format.  Now return to edit the flow and open the Response step, click on ‘Show Advanced Options’ and then ‘Generate from sample’.  Paste the Body text copied to the clipboard and select Done

Back in the List Rows Dataverse step, within the FetchXML, identify the section that you want to make dynamic insert the variable from the prior Initialise Variable step, but make sure you keep the quotation marks surrounding the variable.  Save the Flow


The flow should look like that below

Full Flow

Step 4 – Create the Canvas App

The basic Canvas app is nice and simple.  Connect to the required table.  Add a dropdown box and set its Items property to the required table

Insert a button.  From the menu select ‘Action’ and ‘Power Automate’ and complete the OnSelect property in a similar format to that below, so clicking on the button passes the dropdown box GUID selection to Power Automate and then loads the returned output from the Flow into a collection

ClearCollect(colGrandChildren,DemoDynamicXML.Run(Dropdown.Selected.Country))

Run the Canvas app and select a country.  Canvas Apps is passing the GUID of the selected country to Power Automate to dynamically insert it into the FetchXML.  The results of the query are then passed back to the Power App as a collection and displayed in the gallery

Summary

It is possible to build very complex queries with FetchXML Builder and I know several developers who prefer to use FetchXML queries in a Flow rather than code queries in Power FX.  Personally I prefer executing the queries directly in the Canvas App where possible, but when descending a table structure , there’s no doubt about it, FetchXML is the way to go!

Leave a Comment

Your email address will not be published. Required fields are marked *

Scroll to Top