Power Apps Dropdowns don’t need to be dull! There are many cool features you can add to Dropdowns. In this post I’ll demonstrate 3 techniques to save time and improve usability
Power Apps Dropdowns
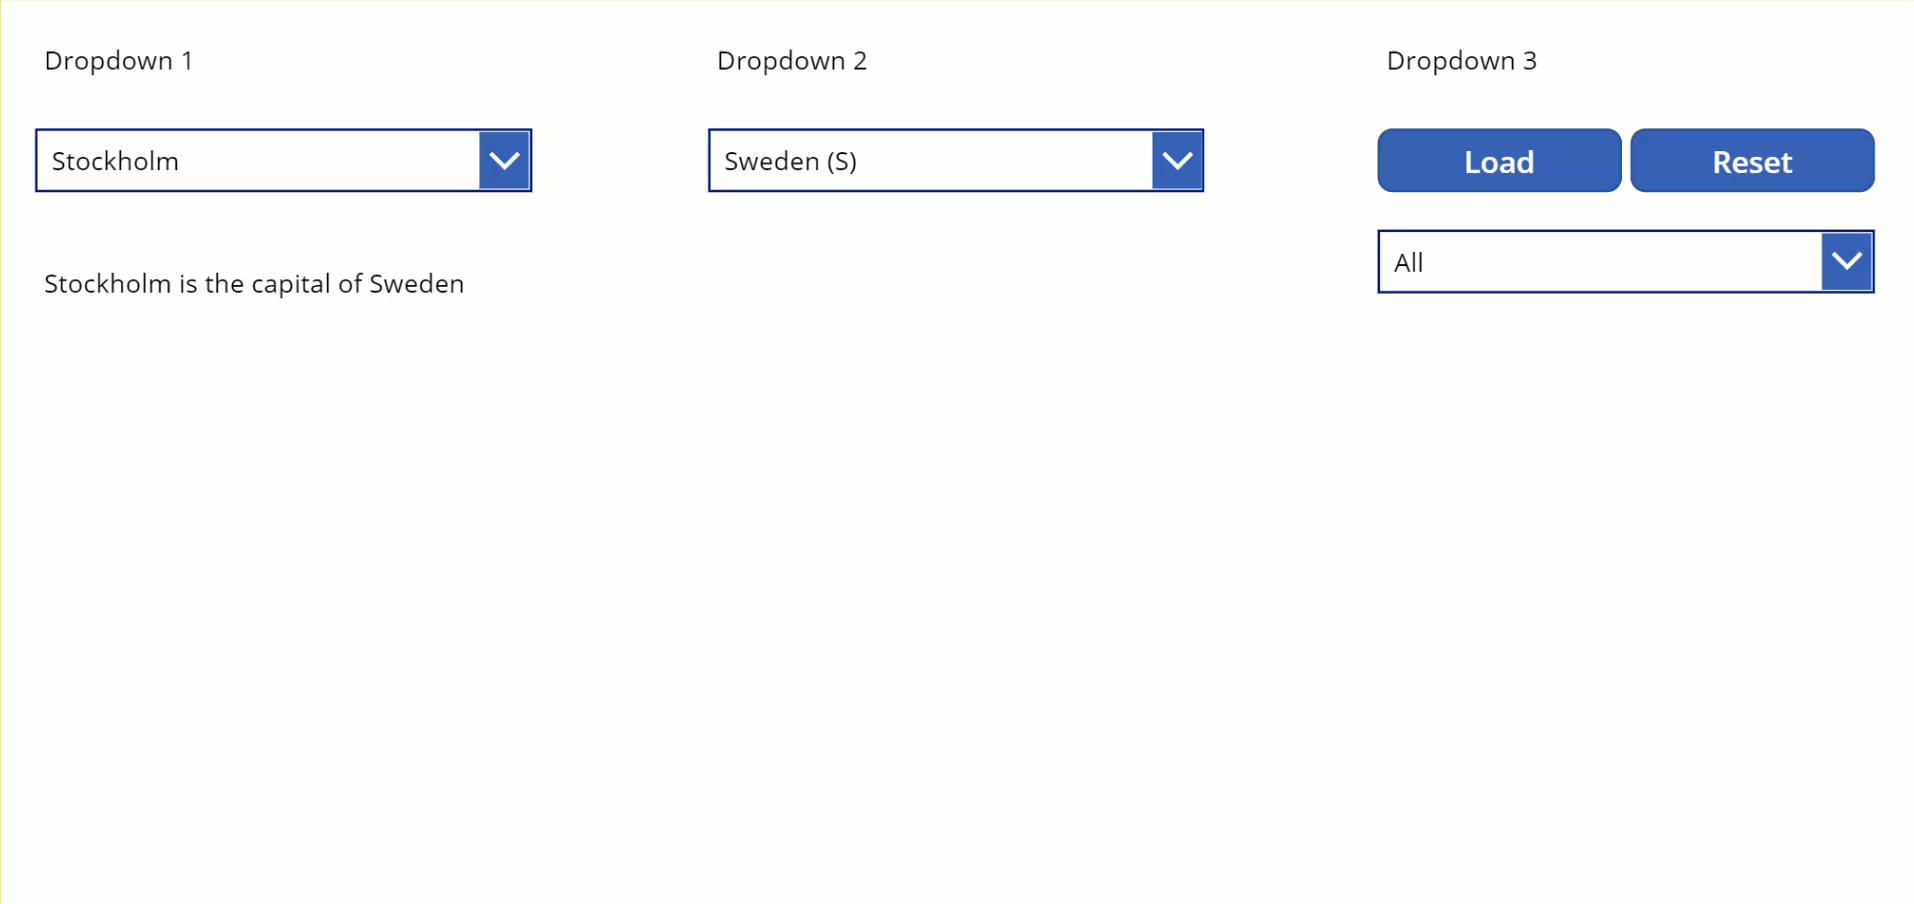
Dropdown 1: Here I’ve taken 2 associated tables and the Dropdown selection for table 1 (Capital) is matched to table 2 (Country). This is done within the Dropdown itself
Dropdown 2: Here the data within two columns is combined using AddColumns and presented in the Dropdown options
Dropdown 3: Although a blank default can be enabled using the AllowEmptySection control. Here we have used ‘All’ which is more descriptive and this option remains selectable, even after an initial Dropdown option is chosen
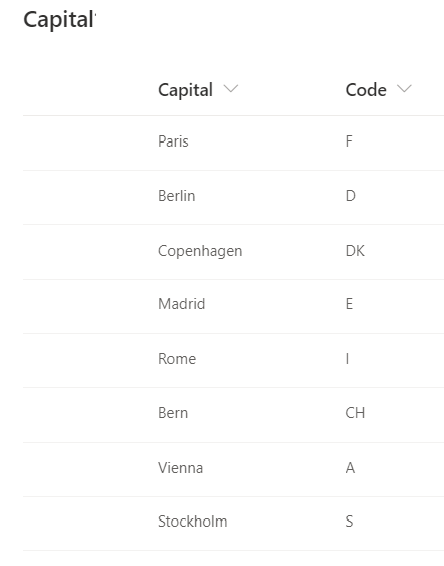
Dropdown 1 and Dropdown 2 use data from the tables below
Dropdown 1
Dropdown 1 enables the selection of a Capital City and then presents the associated Country. This is done by linking the two tables via the common Primary Key (the Abreviation column for the Country table and the Code column for the Capital table)
This could be done using an If or Lookup statement in the Label but here the association between the two tables is performed by the Dropdown control itself. The Dropdown’s Items property is set to the following:
Through the use of the Lookup function getting the associated data from the Capital table, AddColumns creates a new ‘virtual’ column called CapitalCity within the Country table. The SortByColumns function then sorts the new column in ascending (alphabetical) order and presents the data in the Dropdown
Now all we need to do is reference the attributes of the Dropdown in a Label and our work is done:
Dropdown1.Selected.CapitalCity & " is the capital of " & Dropdown1.Selected.CountryName
Dropdown 2
Dropdown 2 only uses the Capital table and merges the data in the two columns and presents the output in the Dropdown box. The Items property of the Dropdown box is set to:
AddColumns creates a ‘virtual ‘column in the Country table called Info. Info contains the merged data from the two columns Title and Abreviation. By only referencing the Info column, ShowColumns removes all columns except Info. SortByColumns then sorts by the one remaining column, Info. Voila! We have our merged column Dropdown box
We could have left the existing columns in place or even merged columns from two seperate tables (similar to Dropdown 1). There a plenty of further possibilties to refine and improve!
Dropdown 3
Dropdown 3 has a ‘All’ option displayed in the Dropdown. This is more intuitive to use than the ‘blank’ option that can be enabled setting by the AllowEmptySection control of a Dropdown to True. The ‘blank’ option also disappears after a selection has been made but the ‘All’ in Dropdown 3 always remains
To create the ‘All’ option, I created a single column Table with the first record populated as ‘All’ using the ClearCollect function. Then the rest of the data to be displayed in the Dropdown is added to the Collection. Before adding, the data could be made distinct using the Distinct function or sorted using Sort or SortByColumns. The important factor though is that ‘Add’ is the first record in the Collection so therefore it is always the default value
The above is performed by the Load Button and its OnSelect property is set to the code below. ColContinents is the name of the Collection and Continent is the Column that contains the records we want to add. In a working App, this action would be carried out when the App or individual screen loads rather than using a Button.
If the Dropdown is used to drive a Gallery, any filtering would be removed when ‘All’ is selected so the full list of records are displayed. The Reset Button returns the Dropdown to its default value ie the first record in the Collection which is ‘All’
An alternative to creating a Collection is to use the Group function to create a Grouped Table, grouped by ‘All’. We then use the Ungroup function so only a single Column Table remains with ‘All’ incorporated into the table as the first row. This approach can take some thinking to get your head around but works like a treat
And there we have it, three simple ways to make Power Apps Dropdowns more intuitive and easier to use
There are many other possibilities. One that would be particularly useful is a dynamic Dropdown that highlights the number of matching records against each option. Perhaps this is something I’ll look at in the future!