In this post I’m going to show how to customise Galleries so you can make changes to Records directly in a Gallery itself. No need to create a separate control outside the Gallery and clutter up the screen
Updating Records from within a Gallery
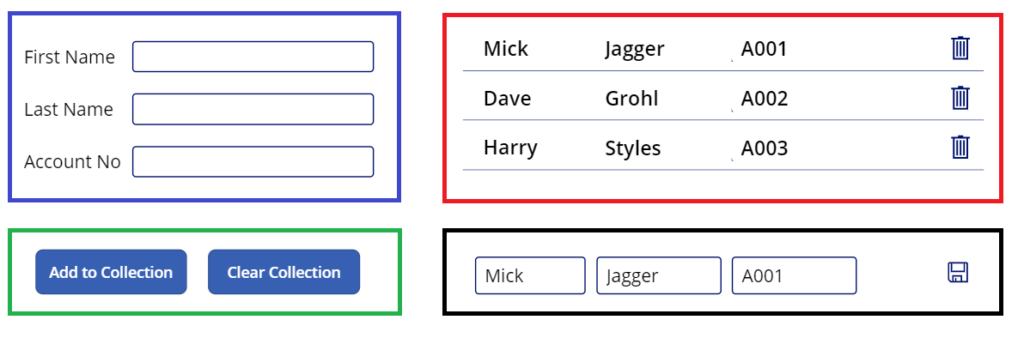
In the previous post, I created a simple app in which you:
Entered names into Text Input boxes (blue box)
Used a button to add to a Collection. A button can also delete the entire collection (green)
Display the contents of the Collection in a Gallery (red)
Edit and Save the contents using Text Input boxes outside the Gallery (black)
I’ve recreated the app below on a tablet wide screen
Functionally, it all works fine, but updating the Records outside the Gallery isn’t particularly intuitive. Unfortunately you can’t update Records from within a Gallery by default. But there is a great workaround
Changing the Gallery Controls from Labels to Text Input Boxes
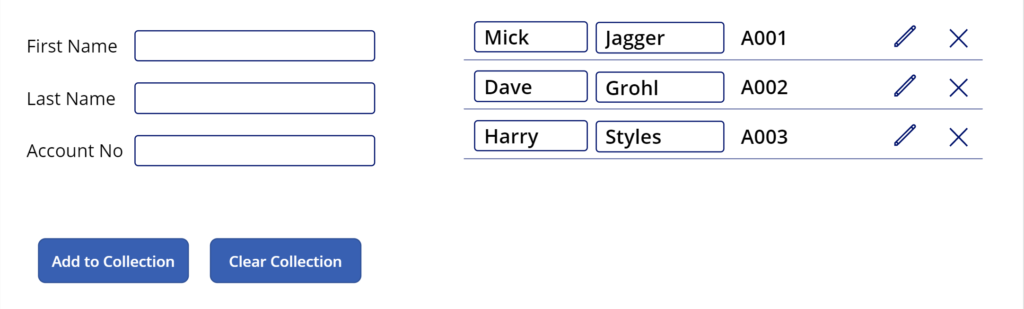
The first thing we will do is remove the black boxed section in the existing App where we Edit the existing records. We won’t be needing this section any more. Instead the editing will take place within the Gallery itself
By default, Galleries contain Labels. Labels don’t have a DisplayMode so their content can’t be edited. That is why on the previous post Input Boxes, Galleries & Collections, we added Text Input boxes to do the editing. We can however replace the Labels in our Gallery with Text Input boxes. We can then use a variable to change their DisplayMode from View to Edit and back to View
However, its not quite as straightforward as it initally seems. In the graphic below the Edit Icon has been used to change the DisplayMode of the First_Name and Last_Name Input Text boxes. We can see that this doesn’t meet our needs because it changes the status of all the Text Input boxes in the Gallery. If a user clicks on any of the Edit Icons, every Record becomes editable
Specifying the Record to be Edited
To ensure only the specific Record selected can be edited, we first need a unique identifer in each record. Typically this will be an account number or similar. The unique identifier usually does not change, which is why we don’t allow the DisplayMode of our Account No Text Input box to be set to Edit
In order to isolate the Record that the change of DisplayMode applies to, we assign the Account No to a Variable. The following line is used for the OnSelect property of the Edit Icon:
Only the Record on which the Edit Icon was clicked will now have the DisplayMode property of the Text Input boxes assigned to Edit. For all the other Records the DisplayMode will remain View. Because the Account No is unique, only one Record can be edited at a time
Defining the OnSelect properties for the Icons in the Gallery
As well as the Delete and Edit Icons, within the Gallery, we need to have 2 additional Icons Save and Cancel. The purpose of each Icon is summarised in the table below
So let’s go through the formula for the OnSelect property for each of the Icons in turn, with an explanation
Delete
Remove(colName,ThisItem) // Removes the Record from the colName Collection
Edit
UpdateContext({conAccountNo:ThisItem.Account_No}); // Variable set to the specific Record's Accout_No
UpdateContext({conEdit:!conEdit})
Save
UpdateContext({conAccountNo:"Null"}); // Variable set to 'Null' so no records will have their DisplayMode set to Edit
Patch(colName,{Account_No:ThisItem.Account_No},{First_Name:Edit_First.Text,Last_Name:Edit_Last.Text}); // Patches the edited fields to the colName Collection
UpdateContext({conEdit:!conEdit})
Cancel
Reset(First); // Both Text Input boxes are reset
Reset(Last);
UpdateContext({conAccountNo:"Null"}); // Variable set to 'Null' so no records will have their DisplayMode set to Edit
UpdateContext({conEdit:!conEdit})
Defining the Visible properties for the Icons in the Gallery
The Visible properties for the 4 Icons should be set as follows to reflect the table above
For Delete and Edit set the value to:
!conEdit
And for Save and Cancel:
conEdit
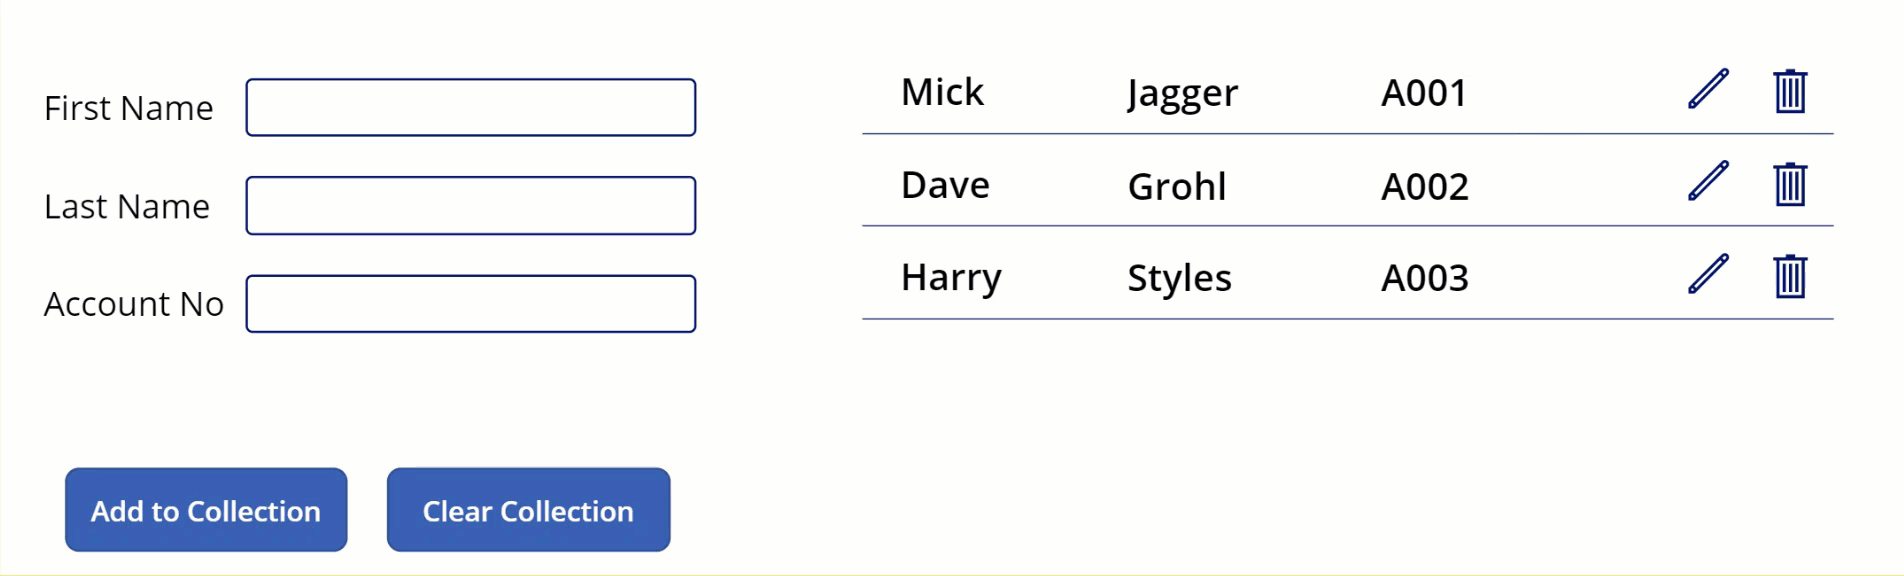
Briging it all Together
Now run the App and see how the Records in the Gallery can be edited, saved and deleted
A much more elgant and usable solution!
Updating Records from within a Gallery
In the next session, I’ll show how to pre-filter a Collection before displaying the contents in a Gallery